If you’re considering upgrading your trailer’s braking system, knowing how to put electric brakes on a trailer can make a significant difference in towing safety and performance. Electric brakes offer enhanced control, especially when towing heavy loads, making them an essential addition to any trailer.
Why Install Electric Brakes on Your Trailer?
Electric brakes are widely favored for their efficiency and the level of control they provide to drivers. Unlike surge brakes, electric brakes allow for adjustable braking power, which can be customized based on the load and road conditions. This feature is particularly beneficial for trailers carrying varying weights, as it allows for smoother and safer stops.
What You’ll Need
Before getting started, gather the following tools and materials:
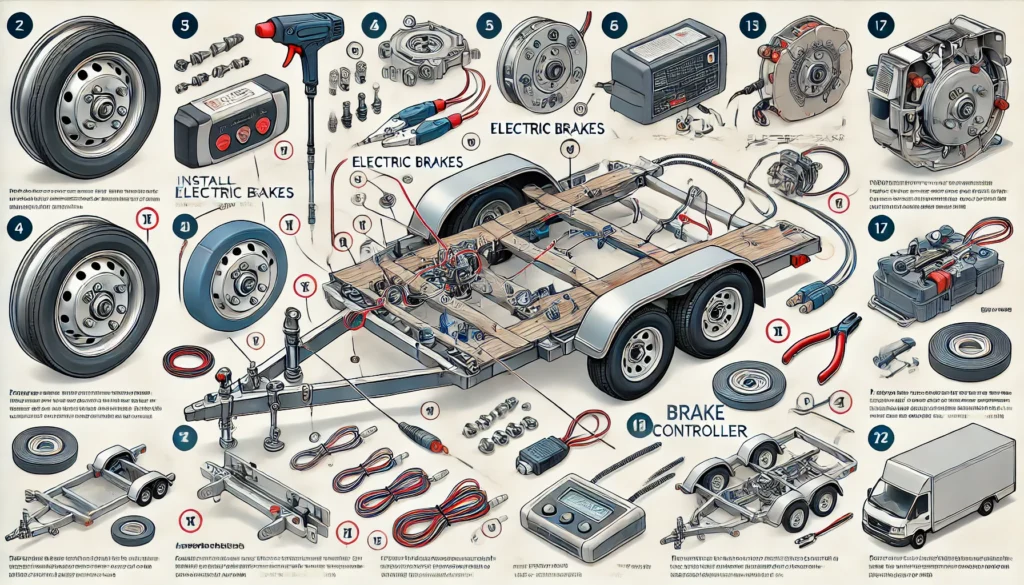
- Electric brake kit (including brake assemblies, drums, and necessary hardware)
- Brake controller for your vehicle
- Wiring harness compatible with your vehicle and trailer
- Drill and drill bits
- Wrenches and sockets
- Screwdriver
- Jack and jack stands
- Torque wrench
Step 1: Prepare the Trailer
Start by parking your trailer on a level surface and securing it with wheel chocks. Use a jack to lift the trailer and place it securely on jack stands. Remove the wheels to access the hub assemblies where the brakes will be installed.
Step 2: Install the Brake Assemblies
Begin by installing the brake backing plates. Align the backing plate with the mounting flange on the axle and secure it using the bolts provided in your brake kit. Ensure that the brake shoes are positioned correctly, facing the direction of rotation.
Step 3: Attach the Brake Drums
Once the brake assemblies are in place, slide the brake drums over the brake shoes. Make sure they fit snugly and rotate smoothly. The brake drum should spin freely when the brakes are not engaged.
Step 4: Wiring the Electric Brakes
Next, connect the wiring for the electric brakes. Each brake assembly will have two wires—one for power and one for ground. Connect the power wire to the main trailer wiring harness, ensuring a secure and corrosion-free connection. Attach the ground wire to a clean, unpainted surface on the trailer frame.
Step 5: Install the Brake Controller
The brake controller is mounted inside your towing vehicle, usually under the dashboard. Follow the manufacturer’s instructions to connect the controller to the vehicle’s electrical system. The controller will need to be connected to the battery, brake light switch, and the trailer wiring harness.
Step 6: Adjust and Test the Brakes
After installation, it’s essential to adjust the brake controller settings. Start with the controller set to a low power level, and gradually increase it while testing the trailer’s brakes. You should feel the trailer braking smoothly without locking up. Make adjustments until you achieve the desired braking force.
Step 7: Final Checks
Before hitting the road, double-check all connections, ensure the brake drums rotate freely, and that the brake controller is functioning correctly. Test the brakes in a safe area to confirm everything is working as it should.
Conclusion
Learning how to put electric brakes on a trailer is a valuable skill that enhances your towing safety. With the right tools and a bit of patience, you can install electric brakes and enjoy the benefits of smoother, more controlled stops on the road.