When it comes to towing a trailer, safety is paramount, and one of the most crucial components for ensuring that safety is an electric trailer brake controller kit. These kits are designed to help you control the braking power of your trailer, making it easier to stop safely and smoothly, especially when hauling heavy loads. In this comprehensive guide, we’ll explore what an electric trailer brake controller kit includes, how to install it, and why it’s a must-have for any serious tower.
What is an Electric Trailer Brake Controller Kit?
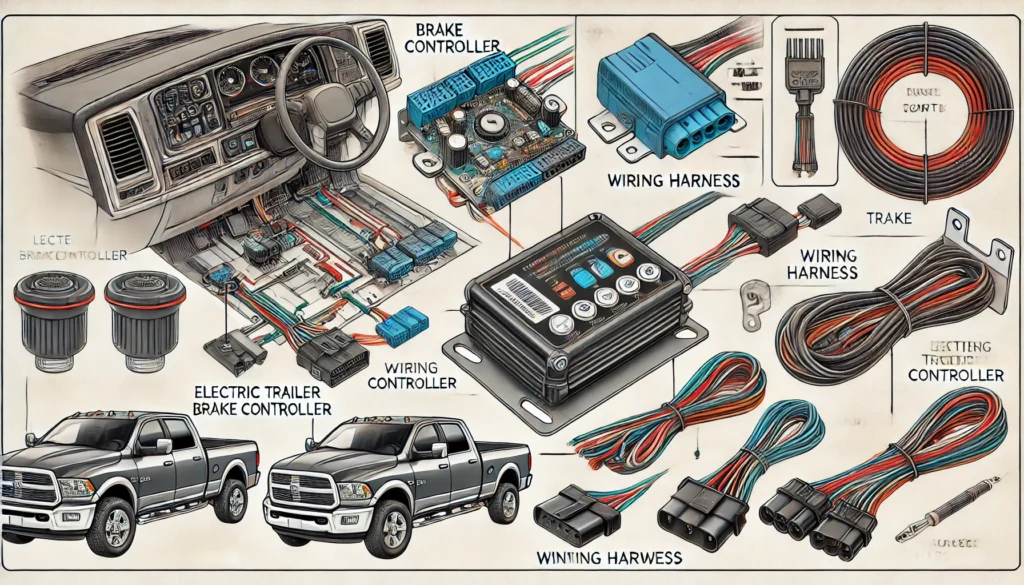
An electric trailer brake controller kit typically includes all the components you need to install a brake controller in your vehicle. These kits usually come with:
- The Brake Controller: The main device that regulates the amount of braking power sent to the trailer’s brakes.
- Wiring Harness: A set of wires that connect the brake controller to the vehicle’s electrical system and the trailer’s brakes.
- Mounting Hardware: Brackets and screws to secure the brake controller in place within your vehicle.
- Instruction Manual: A guide to help you through the installation process.
Why You Need an Electric Trailer Brake Controller Kit
Installing an electric trailer brake controller is essential for anyone who frequently tows a trailer, especially those with significant weight. Here’s why:
- Enhanced Safety: Provides proportional braking, ensuring that your trailer brakes in sync with your vehicle.
- Legal Compliance: Many regions require trailers over a certain weight to have functional electric brakes controlled by a brake controller.
- Improved Control: Allows you to adjust braking intensity based on the load, road conditions, and personal preference.
Step-by-Step Installation Guide
Installing an electric trailer brake controller kit is a straightforward process, but it does require attention to detail. Here’s how to do it:
1. Gather Your Tools
Before you begin, make sure you have the following tools:
- Screwdrivers
- Wire strippers and crimpers
- Multimeter
- Zip ties
- Electrical tape
2. Locate the Mounting Area
Choose a spot under the dashboard, near the driver’s seat, for mounting the brake controller. Ensure it’s easily accessible so you can adjust the settings or use the manual override.
3. Connect the Wiring Harness
- Power Wire (Black): Connect this to the positive terminal of the battery through a circuit breaker.
- Ground Wire (White): Secure this to a clean, unpainted metal surface.
- Brake Light Signal Wire (Red): Attach this to the wire that carries the signal when you press the brake pedal.
- Output Wire (Blue): Run this wire to the trailer connector to control the trailer brakes.
4. Mount the Controller
Secure the brake controller to the mounting bracket using the screws provided. Ensure it’s firmly in place and positioned correctly for easy access while driving.
5. Test the System
Once everything is connected, it’s time to test your installation:
- Power On: The brake controller should light up when you turn on the vehicle.
- Manual Override: Test the manual override by pulling the lever; the trailer brakes should engage.
- Road Test: Take your vehicle for a short drive, applying the brakes at low speeds to ensure the trailer brakes engage smoothly.
Tips for Choosing the Right Electric Trailer Brake Controller Kit
When selecting a kit, consider the following factors:
- Compatibility: Ensure the kit is compatible with your vehicle make and model.
- Features: Look for additional features like proportional braking, digital displays, and adjustable settings.
- Ease of Installation: Some kits come with plug-and-play wiring harnesses that simplify the installation process.
Conclusion
An electric trailer brake controller kit is a vital investment for anyone who regularly tows a trailer. It not only enhances safety but also provides greater control and peace of mind while driving. By following the steps outlined in this guide, you can confidently install your brake controller kit and enjoy safer towing experiences.