When it comes to ensuring safe and effective towing, understanding trailer disc brakes electric is crucial. These advanced braking systems provide superior stopping power and reliability compared to traditional drum brakes, making them a popular choice for many trailer owners. In this guide, we’ll explore the benefits of electric trailer disc brakes, how they work, and offer a detailed guide on their installation and maintenance.
What Are Trailer Disc Brakes Electric?
Trailer disc brakes electric are a type of braking system that uses electricity to control the braking action. Unlike drum brakes, which rely on brake shoes pressing against a drum, disc brakes use brake pads that clamp down on a rotor attached to the wheel. This design offers more consistent braking performance, especially under heavy loads, and is less prone to overheating.
Benefits of Electric Disc Brakes for Trailers
- Improved Braking Performance: Disc brakes offer better stopping power and are less likely to fade during prolonged use, making them ideal for heavy trailers.
- Ease of Maintenance: Disc brakes are easier to inspect and maintain compared to drum brakes, as their design is simpler and more accessible.
- Enhanced Safety: With more consistent braking force, electric disc brakes help prevent jackknifing and improve overall towing safety.
How Do Trailer Disc Brakes Electric Work?
The functionality of electric disc brakes revolves around an electronic brake controller, which sends signals from the towing vehicle to the trailer. When the driver applies the brakes, the controller activates the electric actuators on the trailer, which in turn apply the necessary force to the brake pads, clamping them onto the rotor and slowing the trailer.
How to Install Trailer Disc Brakes Electric
Installing electric disc brakes on your trailer involves several key steps:
Step 1: Gather the Required Tools and Parts
Before starting the installation, make sure you have the following:
- Electric disc brake kit (including rotors, calipers, and pads)
- Electric brake controller
- Wiring harness
- Jack and jack stands
- Lug wrench
- Screwdrivers and pliers
- Wire connectors and electrical tape
Step 2: Prepare the Trailer
- Park the trailer on a stable, level surface and use wheel chocks to prevent movement.
- Use a jack to lift the trailer and place jack stands under the frame for safety.
- Remove the wheels to access the hub and brake components.
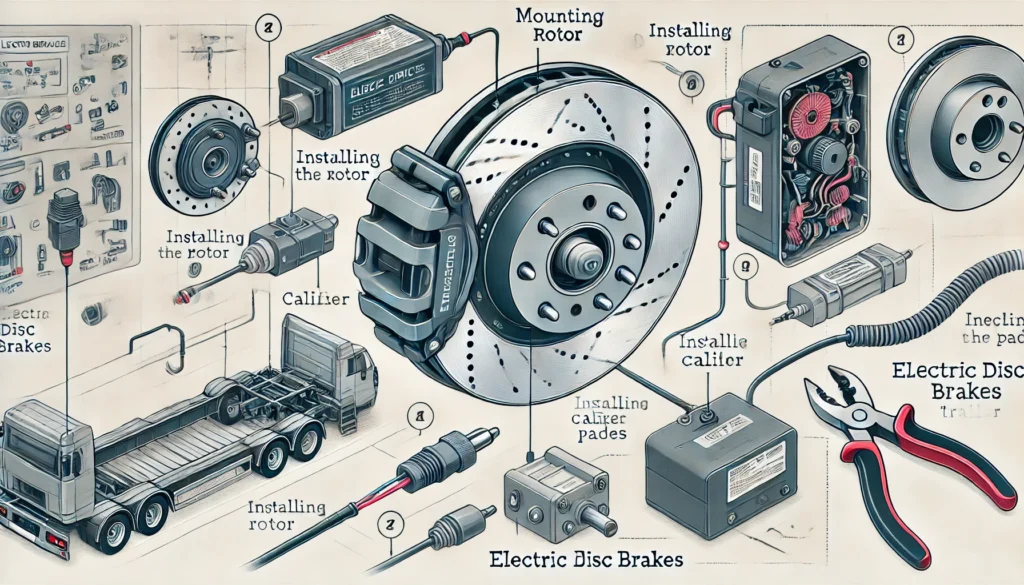
Step 3: Install the Disc Brake Components
- Remove the existing drum brake components from the axle, including the backing plate and hub.
- Install the rotor onto the hub, ensuring it is securely fastened.
- Mount the caliper bracket onto the axle flange and secure it with bolts.
- Attach the caliper to the bracket and install the brake pads within the caliper.
Step 4: Wiring the Electric Disc Brakes
- Run the wiring from the brake controller in the towing vehicle to the trailer’s brake assemblies.
- Connect the wires from the controller to the caliper actuators on the trailer, ensuring that the connections are secure and protected with electrical tape.
- Check the grounding of the brake assemblies to avoid any electrical issues.
Step 5: Test the Brakes
- With the trailer still on jack stands, manually spin the wheels and apply the brake controller to see if the wheels stop smoothly.
- Reattach the wheels and perform a road test at low speed to ensure the brakes are functioning correctly.
Maintenance Tips for Trailer Disc Brakes Electric
- Regular Inspections: Check the brake pads, rotors, and wiring for signs of wear or damage regularly.
- Lubrication: Apply brake lubricant to the caliper slides to ensure smooth operation.
- Brake Controller Calibration: Adjust the brake controller settings to ensure the desired braking force and response.
Conclusion
Upgrading to trailer disc brakes electric is a smart choice for those who frequently tow heavy loads or require superior braking performance. By following this guide, you can install and maintain your electric disc brakes with confidence, ensuring a safer and more reliable towing experience.