If you’re setting up or troubleshooting your trailer’s braking system, a clear wiring diagram for a trailer with electric brakes is essential. This diagram serves as a guide, showing how to connect the various components of your trailer’s braking system to ensure everything functions correctly. In this article, we’ll break down how to read and use a wiring diagram for your trailer’s electric brakes, helping you with both installation and maintenance.
Why Wiring Diagrams Are Important
Wiring diagrams are crucial for ensuring that all electrical components in your trailer’s braking system are correctly connected. This ensures that your trailer’s brakes will engage properly when you apply the brakes in your towing vehicle, providing safe and reliable stopping power.
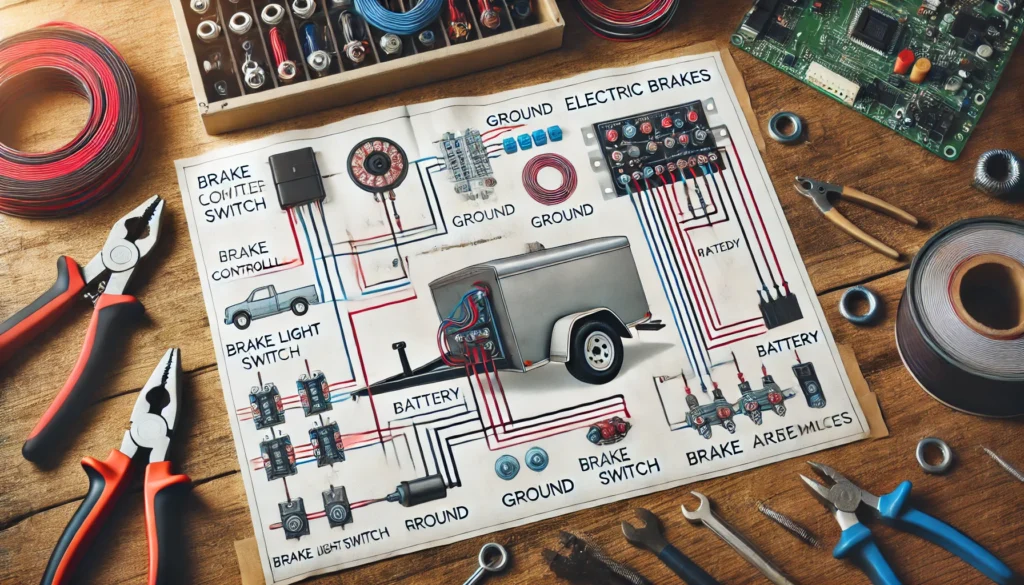
Key Components in a Wiring Diagram for Electric Brakes
Before diving into the wiring process, it’s important to understand the key components typically represented in a wiring diagram:
- Brake Controller: The device installed in your towing vehicle that sends electrical signals to the trailer’s brakes when you apply the vehicle’s brakes.
- Battery: Powers the brake controller and the trailer’s brakes.
- Wiring Harness: The bundle of wires that connect the brake controller to the trailer’s braking system.
- Ground Wire: Completes the electrical circuit by grounding the system to the vehicle’s chassis.
- Trailer Connector: The plug that connects the vehicle’s wiring to the trailer’s wiring, allowing signals and power to flow between them.
- Breakaway Switch: A safety device that automatically engages the trailer’s brakes if the trailer disconnects from the towing vehicle.
How to Read a Wiring Diagram for Electric Brakes
Understanding how to read a wiring diagram is the first step to ensuring your trailer’s brakes are properly wired:
- Identify the Components: Start by identifying the symbols representing the brake controller, battery, ground, and other components.
- Follow the Wiring Path: Trace the wiring from the brake controller to the trailer’s brakes. The diagram will show how the wires connect and where they should be routed.
- Understand the Symbols: Familiarize yourself with common electrical symbols used in the diagram, such as those for power, ground, and connections.
- Check Connection Points: Pay attention to where wires meet or split, ensuring each connection is properly made to avoid wiring errors.
Step-by-Step Guide to Wiring Your Trailer
Once you’ve understood the wiring diagram, you can begin the wiring process:
1. Gather the Necessary Tools and Materials
- You’ll need wire strippers, crimping tools, electrical tape, connectors, a wiring harness, and a brake controller.
2. Install the Brake Controller
- Mount the brake controller in your towing vehicle, usually under the dashboard.
- Connect the power wire to the vehicle’s battery and ground the controller to the chassis.
3. Run the Wiring Harness
- Route the wiring harness from the brake controller to the rear of the vehicle, securing it along the frame.
- Use the wiring diagram to connect the correct wires to the trailer connector.
4. Connect the Trailer’s Brakes
- Connect the wiring harness to the trailer’s brake assemblies, following the diagram.
- Ensure all connections are secure and protected with electrical tape or heat shrink tubing.
5. Test the System
- After completing the wiring, test the brakes by connecting the trailer to the towing vehicle and applying the brakes.
- Adjust the brake controller settings as necessary to achieve smooth braking.
Troubleshooting Common Wiring Issues
Even with a clear wiring diagram, issues can arise. Here are some common problems and solutions:
- Brakes Not Engaging: Check all connections, particularly the ground, to ensure they are secure.
- Intermittent Braking: Inspect the wiring harness for loose or damaged wires.
- Weak Braking Power: Adjust the brake controller settings or check for worn brake shoes.
Conclusion
A proper wiring diagram for a trailer with electric brakes is essential for safe and effective towing. By following the steps outlined in this guide and using the wiring diagram as your reference, you can confidently wire your trailer’s brakes and ensure they function correctly. Regular maintenance and testing will keep your braking system in top shape, providing peace of mind on every journey.